The AEM Dispatcher is the caching and load balancing tool for Adobe Experience Manager (AEM). It helps enhance the security, scalability, and performance of your AEM applications. This guide will walk you through the process of getting the AEM Dispatcher up and running on your local machine.
Key Takeaways
- Implementation of AEM Dispatcher locally helps in local development, testing and debugging.
- The setup process involves installing a web server, configuring the dispatcher module, testing the setup, and troubleshooting common issues.
- Regular updates and maintenance are necessary to keep the dispatcher running smoothly.
Understanding AEM Dispatcher
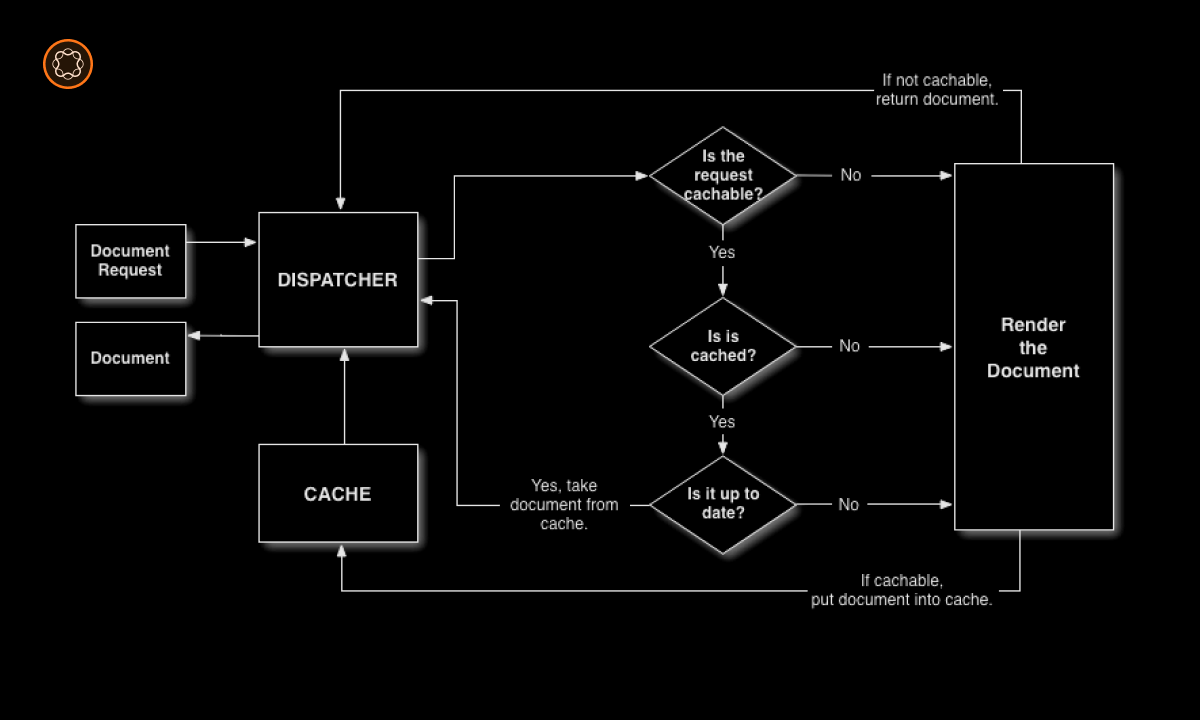
The AEM Dispatcher works as the first point of contact for all client requests and performs tasks like caching, load balancing, and filtering. Setting it up locally allows developers to mimic the production environment, thereby making it easier to develop, test, and debug AEM applications.
Installing a Web Server
The Dispatcher is a module that needs to be integrated with a web server. Depending on your operating system, you can use Apache HTTP Server, Microsoft IIS, or Sun Java Web Server. This guide uses the Apache HTTP Server as an example.
Steps to Install Apache HTTP Server
- Download the Apache HTTP Server software from the Apache website.
- Run the installer and follow the prompts to install the server on your local machine.
Configuring the Dispatcher Module
After the web server is installed, the next step is to configure the Dispatcher module.
Steps to Configure Dispatcher Module
- Download the Dispatcher module from the Adobe website that matches your web server and operating system.
- Extract the downloaded file.
- Copy the dispatcher module (for example,
mod_dispatcher.so) to your Apache modules directory. - Open the
httpd.conffile in the Apache conf directory and add the lineLoadModule dispatcher_module modules/mod_dispatcher.so. - Configure the dispatcher settings as per your requirements.
Testing the Setup
After setting up the Dispatcher, it’s essential to test it to ensure it’s working as expected.
Steps to Test the Setup
- Start the Apache server.
- Open a web browser and navigate to
http://localhost. - If your setup is correct, you should see the AEM website.
Updating the Dispatcher
To ensure the Dispatcher continues to work efficiently, it’s important to regularly update it with new versions released by Adobe.
Steps to Update the Dispatcher
- Download the latest Dispatcher module from the Adobe website.
- Follow the same steps as in the ‘Configuring the Dispatcher Module’ section to implement the update.
Troubleshooting Common Issues
During the setup and use of the Dispatcher, you might encounter a few common issues:
Issue: Dispatcher not caching pages: Check your dispatcher configuration file (dispatcher.any) to ensure caching is enabled.Issue: Apache server not starting: Ensure that the Dispatcher module is correctly installed and that there are no conflicts in thehttpd.conffile.
Conclusion
Setting up the AEM Dispatcher locally is a crucial aspect of AEM development. By installing a web server, configuring the Dispatcher module, and regularly updating and maintaining your setup, you can create a local development environment that closely mimics your production setup. Always remember to troubleshoot and resolve any issues that arise, ensuring your Dispatcher continues to function effectively.

I’m Kirill Efimov, an experienced AEM developer with over 10 years of experience in Java and web development. I’m skilled in developing AEM components, templates, workflows, and integrations with other systems, and I’m passionate about delivering high-quality solutions to my clients.
I also believe in knowledge-sharing and staying up-to-date with the latest developments in the industry. Through blog posts, tutorials, and speaking engagements, I’m committed to contributing to the AEM community and helping others overcome the challenges they may face in their AEM projects.