
Adobe Experience Manager (AEM) uses a component-based architecture, where each piece of content or functionality is encapsulated within a component. AEM’s Core Components provide a set of standardized, flexible, and easy-to-use base components. However, you might need to extend these core components to meet specific project requirements. This guide will take you through the process of extending core components in AEM.
Key Takeaways
- Core components in AEM provide a base set of functionality that can be extended to meet unique project requirements.
- The process of extending core components involves creating a new component, overlaying the original component, and adding or modifying functionality.
- Understanding sling resource resolution and inheritance is crucial for effective component extension.
- Extending core components should be done carefully to ensure compatibility and maintainability.
- Extending, rather than modifying core components, ensures that you can safely upgrade AEM without losing customizations.
Understanding Core Component Extension
What is Core Component Extension?
Core component extension is the process of creating a new component that inherits properties and functionality from an existing core component, and then adding or modifying features according to the project’s requirements. This approach maintains the original component’s functionality while allowing for customizations.
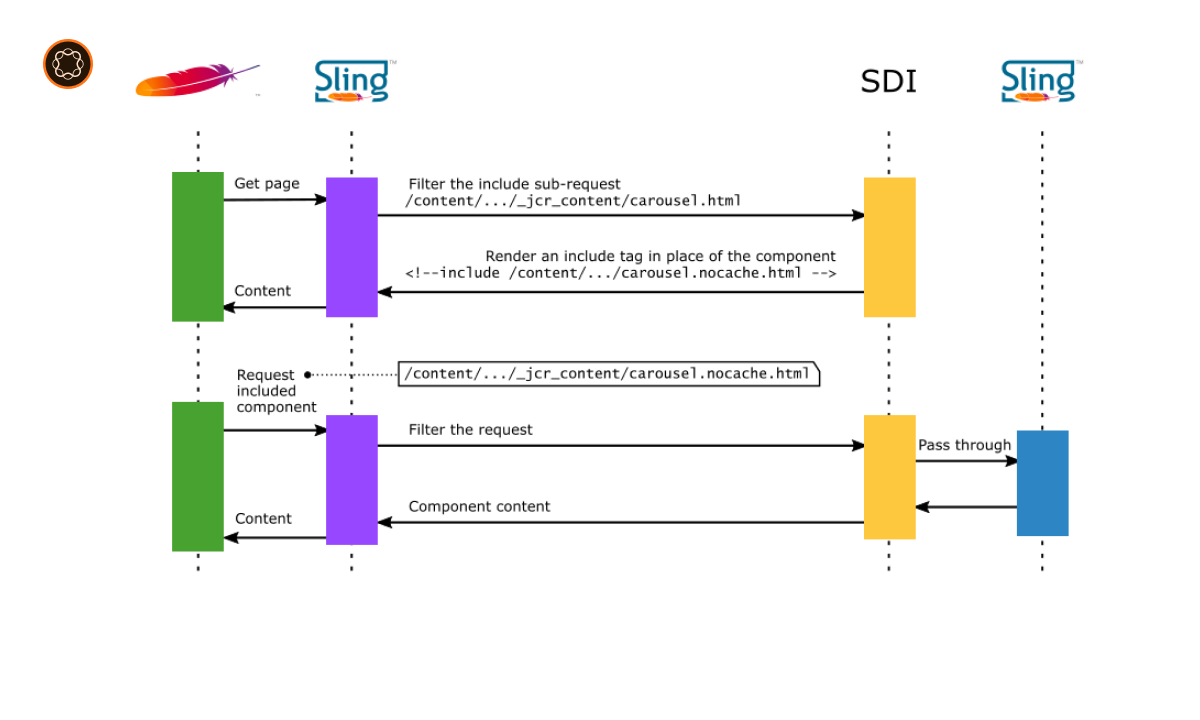
The Role of Sling Resource Resolution
Sling resource resolution is crucial in component extension. It is the mechanism that AEM uses to map a URL to a resource, and it plays a key role in determining which component scripts are executed when a component is called.
Creating a New Component
To extend a core component, you first need to create a new component:
- Navigate to the
/appsdirectory in CRXDE Lite. - Create a new folder for your component under a suitable project-specific directory.
- Add a
.content.xmlfile to define your component and specify the core component as the “sling:resourceSuperType”.
Overlaying the Core Component
Next, you overlay the original component’s scripts in your new component:
- Copy the core component’s scripts to your new component’s directory.
- Modify the scripts as needed.
Adding Functionality
You can now add or modify functionality in your new component:
- Add new scripts or modify existing scripts in your component’s directory.
- Test your changes thoroughly to ensure they work as expected.
Inheriting Dialogs
Your new component will automatically inherit the core component’s dialog. If you want to modify the dialog:
- Overlay the dialog in your new component’s directory.
- Modify the dialog as needed.
Testing Your Extended Component
After extending a core component, it’s crucial to test your new component:
- Test all functionality, both inherited and new.
- Check that the component renders correctly in various contexts.
- Ensure that the component’s dialog works correctly.
Understanding the Implications
Extending core components has several implications:
- Maintainability: Keeping customizations separate from the original core components makes your components easier to maintain.
- Compatibility: Properly extended components will be compatible with future upgrades of AEM and core components.
- Performance: Adding complex functionality can impact a component’s performance.
Conclusion and Next Steps
Extending core components in AEM is a powerful way to create customized functionality while maintaining compatibility with AEM’s standard features. This process involves a deep understanding of AEM’s component architecture and Sling resource resolution. After mastering core component extension, you might explore more advanced component development techniques or delve deeper into AEM’s underlying technologies. Remember, effective component extension requires careful planning, diligent development, and thorough testing.

I’m Kirill Efimov, an experienced AEM developer with over 10 years of experience in Java and web development. I’m skilled in developing AEM components, templates, workflows, and integrations with other systems, and I’m passionate about delivering high-quality solutions to my clients.
I also believe in knowledge-sharing and staying up-to-date with the latest developments in the industry. Through blog posts, tutorials, and speaking engagements, I’m committed to contributing to the AEM community and helping others overcome the challenges they may face in their AEM projects.